Python图片处理模块Pillow

Python图片处理模块Pillow
PIL:Python Imaging Library,是Python平台事实上的图像处理标准库,但PIL年久失修,仅支持到Python 2.7。于是一群志愿者在PIL的基础上创建了兼容的版本,名字叫Pillow,支持最新Python 3.x,作为PIL的替代版本。
以这张懒羊羊的图片为例介绍基本用法:

1. 安装
在命令行下通过pip安装:
1 | pip install pillow |
图片属性
1 | # 导入模块 |
转化为灰度后:

格式转换
1 | # 导入模块 |
制作缩略图、图标
1 | # 导入模块 |
缩略图效果:

3 案例
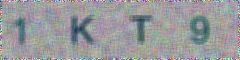
生成验证码
1 | from PIL import Image, ImageDraw, ImageFont, ImageFilter |
生成的验证码图片:

模糊处理后的:
Comments
Comment plugin failed to load
Loading comment plugin